This post is a long one, so bear with me as I take you through the creation of a new tiller for the Westsail 32' - as of yet, no name, but I have a lot of time to come up with just the right one. Having some spare power tools around the shop collecting dust, I decided to sell them and raise some financial wherewithal to procure material in order to build a new tiller. Yes it will be some time before the tiller will have practical use, but I couldn't resist employing the 10" Grizzly cabinet saw...and it had been a while since I mixed up a batch of epoxy!
With the old Craftsman table saw and jointer successfully liquidated via Craigslist, I made a run to one of my local lumber suppliers for materials. The Westsail build manual calls for ash and mahogany for the assembly of the tiller. While ash is not the best species to use in the marine environment, I thought I'd stick as closely to the "factory settings" as I could; plus, the ash would offer a nice contrast to the mahogany. My premise going into this tiller build was that I would painstakingly care for the varnish through the tiller's years of exposure to the harsh marine enviro - seriously, I like chillin' on the boat, prepping and varnishing brightwork...it's therapy. So, I decided to go forward with the materials (ash and mahogany), and thought I could always replicate the tiller with teak at 4x the expense.
The material list called for roughly 3 board feet of ash and 3 board feet of mahogany, alternating 8 1/2"-thick ash and mahogany boards My supplier had 1" thick material as the thinnest available; not true 4/4 boards, making the 1" dimensional lumber just a tad over 3/4" - waste was inevitable. After spending some time choosing the material, I drove away with 2 12' long and 7" wide ash boards, and 2 12' long and 7" wide mahogany boards - 21 board feet! Well, scraps will not be going into a pot-belly stove; rather, they will serve as cleat stock where needed.
The first order of business was to take the lumber down to the dimensions that I needed for the tiller, and I got started on the 25th of November, 2012. The tiller called for 8 boards at 70" in length glued up, alternating layers of ash and mahogany. I began by taking the boards to their 70" length, and then ripping them to about 3 and 1/8" - the finished width of the tiller would be 3" - so the additional 1/8" would allow some material to feed through the jointer, providing a good edge.
Next, I began to take the material down from just over 3/4" thickness to just over 1/2" thickness. I suppose I could of made several passes through the planer, but eventually decided that ripping the boards through the table saw would yield quicker results. I was careful not to take too much material off the boards, thinking that being conservative would net the least waste, and prevent return trips to my lumber supplier.
I turned the 3 and 1/8" dimension on its vertical, set my rip fence so that I would remove about 1/4" of material (1/8" by blade, and the balance in a 1/8" thick 3 and 1/8" wide veneer), and began several passes per board, raising the saw blade a touch for each new pass until I achieved my desired dimension.
I quickly discovered that my saw blade could use some sharpening, as smoke began billowing from beneath the table, especially on the ash boards. Not to be deterred, I ventured forward in a deliberate and controlled manner until I had the boards all cut. This would take a couple sessions due to grad-school finals looming, and the requisite study time pestering me. I finished dimensioning the boards by running them through the planer (creeping up on the 1/2" dimension), and by running them across the jointer (ensuring a good 3" thickness).
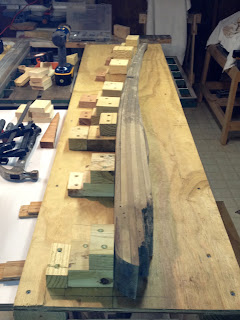
By the end of the rip session, I had 8 boards dimensioned at 70" in length, 3" in width, and 1/2" in thickness: 4 ash boards and 4 mahogany boards.
You can see the original tiller from '77 to the right of the newly dimensioned ash and mahogany boards. It's amazing how much sawdust one can create with a little effort! The boards were now ready to be placed in the jig. Naturally, the construction of the tiller jig would be my next endeavor.
On the 2nd of December, 2012, I began assembling what would become the jig for the layup of the boards to create the new tiller. I used a scrap piece of 5/8" pressure treated ply, and replicated the tiller's fair curve over its surface. I referred to the Westsail tiller schematic for the crown dimension over the length - 1 and 3/4". However, when I laid the dimensions out over the plywood base, the curve didn't seem adequate and pronounced enough. I then decided to build to the fair curve of the existing tiller, as it was pleasing to my eye.
I imagine that the final shape of the tiller would be a subjective pursuit, and beauty would rest in the eye of the craftsman - quick to defend any miscalculation, or "bump" in its lines. In short, what I considered attractive, would be just fine. My only uncompromising objective would be that the tiller could withstand the forces and strains put on it while in service on the Westsail. I believed I was well on my way to accomplishing that objective.
Having a number of backing blocks cut to aide in defining the curve of the tiller, and to which clamps would be secured while the tiller cured, I began to install them across the plywood base.
By the time I was finished securing the blocks it had become late, and so further work would have to wait for another day; the tiller's jig was complete though.
I couldn't resist placing the first of the mahogany boards into the jig to see what kind of crown I had created, and how pleasing the curve was.
Satisfied, I decided to prepare to move forward with the layup of the boards in the jig...
On the 15th of December, 2012, I got started with the layup process. I used West System epoxy for this process, as I am most comfortable using this brand and feel most confident in its performance. If anyone out there would like to offer alternatives (and working knowledge) for consideration, I would love to hear from you. I do have a lot of epoxy work coming up on the interior of the Westsail, and the West System prices are not to be trifled with.
I laid out a couple saw horses for a work surface, and then covered them with plastic sheeting to avoid accidental adhesion. I then wiped all of the surfaces of the ash and mahogany boards with solvent to remove oils and contaminants, then set them aside.
Next, I began mixing batches of "neat" epoxy to brush onto the tops and bottoms of each board (except for the top of the top board and bottom of the bottom board). Brushing on "neat" epoxy to the surface of the boards serves a great purpose: performing an initial saturation of the boards with "neat" epoxy allows the boards to pull the epoxy down into the cell structures of the wood, and ensures that when you come back with the thickened mixture that you are not left with any areas starved of resin. In short, this provides for good success in your layup efforts.
After I had wet out all the surfaces with "neat" epoxy, I came back with subsequent batches of epoxy thickened with 406 silica and 407 low-density fairing material. The thickened epoxy would ensure that any small voids in the surface of the boards would be filled, and a consistent layup would be the result.
I had to work without delay, not fast but steady, due to the working time of the epoxy. So I would mix a batch of epoxy, then thicken it with the 406 and 407 agents, and then brush this material on the boards' surfaces. I placed another sheet of plastic on the jig's surface, and after applying the thickened epoxy to each board, I would stack in a predetermined arrangement: first altering ash and mahogany boards, but also choosing to strategically position knots in the wood in areas that I knew would later be removed in the shaping process.

Once I had all the boards brushed with the "neat" and thickened epoxy, and stacked, I wrapped the boards in plastic turned them over on their sides and then proceeded to clamp securely in the jig. This process was a little stressful at one point - having two clamps fail on me - but in the end I was able to secure the boards together and also to secure them to the jigs. I have often heard that one can never have too many clamps. I would leave the layup in the jig for a few days to ensure a full cure.
On the 20th of December, 2012, after almost a week of cure time had passed, I removed the clamps and the layup from the jig and unwrapped the plastic sheeting. As expected, and hoped for, I had good squeeze-out consistently across the boards. This squeeze-out would ensure that I had a good bond of all surfaces, and that voids were not something I had to worry about.
You can see in the picture, at left, the sheen of cured epoxy across the surface of the tiller - what would become the tillers starboard side. My next job would be to clean the surfaces, and rid of all excess epoxy.
I felt that the best tool for this job would be my smaller bench plane. Dialing the blade so that it was just proud of the plane's base, I made several passes removing material until I arrived at a smooth surface. The planing took about an hour to an hour and a half, and required me to disassemble and sharpen the blade mid-way through, but I achieved good and fast results.
Working both sides of the tiller, I achieved good results to allow me to continue laying out the rough cuts...
Here is the laid up material, and a somewhat tiller-shaped hunk of ash and mahogany. There would be more sanding required on the sides, but you can see that the plane did a fine job at material removal.
On the 27th of December, 2012, I began laying the lines for the rough cutting by first starting with the top of the tiller. Although I would not perform rough cuts on the top of the tiller first, my eye went to laying out the overhead dimension first.
The Westsail tiller schematic calls for the first 8" from the butt end of the tiller to be a true 3" wide by 4" tall, and then to taper down to 1.5" by 1.5" at the handle. I referenced the original tiller, as well as incorporating the manual's suggested dimensions. In the end, I settled on a tiller that incorporated a little of both - factory dimensions and my design.
My next step was to create the fair curve for the bottom of the tiller. This step would entail removal of the most material, and would give definition to the tiller and compliment the tiller's crown.
Once I had a good "rough" curve outlined on the belly of the tiller, I took it over to the bandsaw and quickly destroyed and aging blade. What I really did was to force this pretty dense block of wood and epoxy across a very small blade, not in the most graceful and patient manner either. So, after a change of the blade, ensuring I had good alignment between the two wheels and good tension on the new blade, I continued my rough cutting efforts. I removed as much material I dared to...
A pic of the newly installed blade; a blade that could handle the epoxy-ash-mahogany composition.
On the 31st of December, and after I removed most of the material from the tiller, cutting as close to my rough-in lines as I dared to, I set-up a work surface outside to continue the shaping efforts. You can see the Porter Cable 7335 workhorse above, and the Dewalt 6" VS ROS below. Using these two power tools enabled me to work fairly quickly in getting to a close-to-satisfactory dimension and overall shape.
I couldn't get away from shaping with the plane as well, there is just something about this motion, and seeing those curls fall to the ground after passing a sharp blade across the surface. Having the time, I would much rather use hand tools and cut material "rather than pulverize it" - Nat Benjamin, wood boat designer and builder.
Following the factory design schematic, as well as incorporating some of my own design attributes, I shaped the tiller to a point that was close to the final product.
On the 1st of January, 2013, I brought out the router to begin easing the edges - actually, to put a 1/4" round over on all edges.
I set up the router with a 1/4" round over, placed the highest dimension of the bit in plane with the base of the router, and then proceeded to cut a test piece - using the portion of the ash and mahogany layup that I removed during the rough cutting on the bandsaw. The 1/4" felt nice under my hand, and so I decided to move forward with routing the edges of the entire tiller. The work went rather fast; and once I had completed this 1/4" round over, I immediately prepped the surfaces for a sealer coat of varnish.
Still working on the first of January, I mixed up some Epifanes High-Gloss, cutting it with brushing thinner by about 30 to 35%, and brushed on a sealer coat with a foam brush.
On the 4th of January, I came back to the workshop after a few days of letting the varnish cure, I approached the tiller needing to make another rather necessary and critical cut. The end of the tiller, top and bottom, is rounded at a 2" radius. This rounding over of the top and bottom allows the tiller to be raised and lowered in the tiller box. If, for example, a person at the helm wanted to stand up in the cockpit and steer the vessel, the rounded end allows for the tiller to do just that without bottoming out on the rudder itself - the Westsail 32 is a keel / transom-hung rudder configuration.
So, finding the center point between top and bottom, as well as 2" in from the end, I placed a scratch awl in a scrap piece of wood...placed a pencil in yet another hole in the scrap wood, and 2" from the scratch awl, and drew an arc - creating a 2" radius.
Next, I took the tiller back over to the band saw, and rough cut the radius to prepare for further shaping with the smaller power tools. I ended the day with this rough cut.
My next work session was on the 5th of January, the very next day. I spent the next few hours working the tiller to a pleasing shape. First, I brought the router back out to router a 1/4" round over on the freshly cut 2" radius at the end. I didn't quite have the router bit flush with the router base, and so ended up with a deeper cut than I had intended. No matter, I used some finesse to bring these edges smooth.
Here is the end of the tiller in its finished stage of shaping - varnishing remains, as well as drilling a 1/2" diameter hole through the tiller to accommodate the 1/2" bolt that secures it to the tiller box.
The handle needed some further refining as well. The original 1/4" round over that I routed over the edges didn't quite feel comfortable in the hand - it was still a little too "boxy". To fix this, and thereby create a more ergonomic and generally comfortable handle, I routed the edges with a 1/2" round over. This proved to be just what was needed. I made some small refinements on the end of the tiller, and then set things up for another sealer coat of varnish.
I again cut some Epifanes High-Gloss by roughly 30 to 35%, and brushed on a sealer coat on the 5th of January. Here are two views of the tiller showing the nice layering of the ash and mahogany, as well as the final shaping. I will drill the 1/2" diameter hole in the end of the tiller in the coming week.
After lightly hand-sanding the tiller with 220 grit paper, I came back with the second coat of varnish, thinned by roughly 10%, on the evening of the 13th of January...6 more coats to go!